In Sitecore Training you learned how to create a Visual Studio Project for your Sitecore Instance. This is an awesome start for your first project, however as you start to share functionality across projects, create your own modules, or start working in a multiple sites per instance scenario, you may need multiple projects per instance.
In the solutions I have architected, I generally will leave the Sitecore instance as is and create projects in their own projects folder. These projects can then be deployed to the sitecore instance as needed by copying over the dll and any layouts, sublayouts etc. Architecting the Content Tree and Physical Folders will be in a future QuickStart.
In this blog article, I will be creating a Visual Studio Project that could be used for a single site within the Sitecore Instance.
Step 1: Create a Visual Studio Class Library.
Click on the File Menu and Click New and then Project
On the left panel ensure you have clicked Windows then on the right click Class Library. Name your project and directory to store your project.
Step 2: Add References To Sitecore Kernel and Sitecore Logging
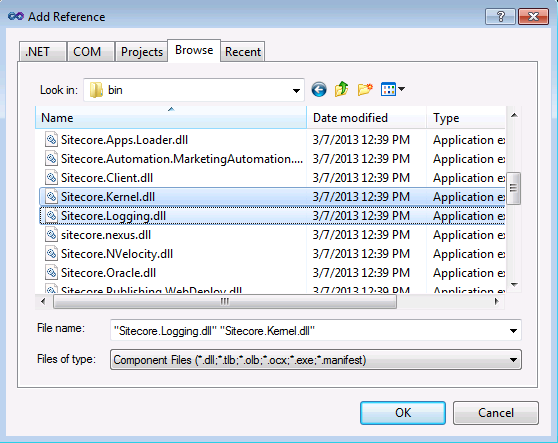
In the Solution Explorer Panel, Right click on References then click on Add Reference...
Click on the browse tab and navigate to the bin folder of your sitecore instance. Select the Sitecore Kernel and Sitecore Logging DLLs. Alternatively you could place these dlls in a shared folder. Click OK to Add References.
Add References to your project for System.Web
Step 3: Create folders for your Sitecore Components
NOTE: This is a very basic folder structure. Your project may have a more sophisticated structure to represent your solution. However the concept of deployment on build is the same.
STEP 4: Add Build Events
Right click on your project and click on properties
Click on Build Events
In the Post-build events command line paste the following.
xcopy "$(ProjectDir)Layouts" "C:\inetpub\wwwroot\SitecoreQuickStart\Website\Layouts" /s /I /y
xcopy "$(ProjectDir)Renderings" "C:\inetpub\wwwroot\SitecoreQuickStart\Website\Renderings" /s /I /y
xcopy "$(ProjectDir)Sublayouts" "C:\inetpub\wwwroot\SitecoreQuickStart\Website\Sublayouts" /s /I /y
xcopy "$(ProjectDir)bin\debug\SitecoreQuickStart*.pdb" "C:\inetpub\wwwroot\SitecoreQuickStart\Website\bin" /s /I /y
xcopy "$(ProjectDir)bin\debug\SitecoreQuickStart*.dll" "C:\inetpub\wwwroot\SitecoreQuickStart\Website\bin" /s /I /y
NOTE: Change SitecoreQuickStart to your project name. You may need to add more dlls to copy, however do not be tempted to do a *.dll as you may end up overwriting other versions of dlls in the Sitecore Instance. It is better practice to only copy over the dlls you require. Also, we are copying the Layouts folder to the Sitecore Layouts folder directory. For larger projects it is better to create subfolders beneath the layouts folder unless the Layouts are needed for Sitecore Admin Applications, but that will be discussed in a future post on creating Sitecore Admin Applications.
STEP 5: Compile Your Solution
From the Build Menu Choose to Build Solution. Once completed it should have copied your Sitecore Components to the Sitecore Instance or reported errors in the error list.
Now that your Sitecore Project is set up, the next step is to create your Sitecore Components in the Sitecore Content Tree.


No comments:
Post a Comment